Wednesday, 19 March 2014

Torn and distressed


Hello Peeps

This is a card I did with my stamping group last Saturday in our monthly workshop.


So above you can see the finished card. My thanks goes to Tracy Evens who was the original inspiration for her design in the making cards magazine.


So you will need
 
Archival ink pad Potting Soil
Collage Stamp I used Clarity Stamps Paris Collage
Script stamp
Distress inks in Antique linen, Vintage Photo, Walnut Stamp
Water Mister
Metal ruler
300gsm card stock cut to the appropriate size for your stamp.
Another piece of card A5 3cm trimmed form one long side and one short side.
ink blending mat.
A5 cream card blank
Dark Brown card for matting and layering.
 
To make the card:


So above you can see that I have my ink pad ready and my stamp. So go ahead and ink up your stamp.

 
I have now stamped my image and have left room all around to tear the edges with my ruler.


So I have lined my ruler up covering the image and no am ready to tear.
 
So now you can go ahead and tear the card. Do this to all 4 sides. Its worth mentioning here I have used a good quality card stock as I want a reasonably good torn edge.
 
Next either die cut or punch out two shapes really doesn't matter what they are. In my example above I have die cut from the Spellbinders Nestabilities hearts. Notice also that they are two different sizes. Re-ink the stamp with the potting soil ink pad.
 
Now place the one of the heart shapes over the area of the stamp that you would like to highlight, here I'm doing the dragonfly. Once in place gently rub over with your thumb or finger so the card makes a good contact with the stamp. Try not to move the card.!!!
 
Repeat with the other shape. So re-ink and place your 2nd shape over the image again  pressing gently with your thumb or finger and making sure the whole of the card makes contact with the image.
 
So now you can see I have three stamped images one whole image and two smaller stamped images, Put all these to one side.
 
No for the main background. Here I have assembled my card, stamp, and ink pad. Notice I have not mounted my stamp on to a block. Ink up the stamp.
 
What you need to now is kind of roll the stamp across the card, yes you will get bits that are missing and all sorts of vague images , this is what we want, we are not aiming for a clear image in fact quite the opposite.


So as you can see from above I have stamped the image several times and have even got inks from the side of the stamp. So really quite random here is the key here.


 So what we need to do now is give the edges of our background a worn look so to do this scrape a pair of scissors along the edge of the card. Do this to all four sides.
 
So abeve you can see a close up of one of the sides and the worn look it got.
 Retrieve your three earlier stamped pieces and start applying Antique Linen to the images. You are aiming for a nice even coverage here.do the hearts and script background as well while you have the ink out. 
 
Repeat the process with Walnut stain but don't go quite so far in. Do this for the heart shapes and Paris collage , BUT NOT script background. Leave these pieces to one side.
 
 
Lastly get your main background and with your water mister spray on to your hands and dribble the drops of water on to  the card. Leave it for a few seconds and remove excess water with a paper kitchen towel.  Matt this on to dark brown card and attach to a blank A5 card blank.
Attach main image and then add the hearts.


 Job Done
 
Enjoy.


Sunday, 26 January 2014

One stamp two ways

Hello Peeps
Firstly many apologies fro not blogging for quite a while now its been really busy.

As many of you now know I have been taken on to the design team for Oyster Stamps. yay, so will be with them at Exeter this week, 30th,31st, January and 1st February 2014. Be good to see you there.

The two samples  I have for you today are techniques that I taught my stamping group on Saturday just gone.


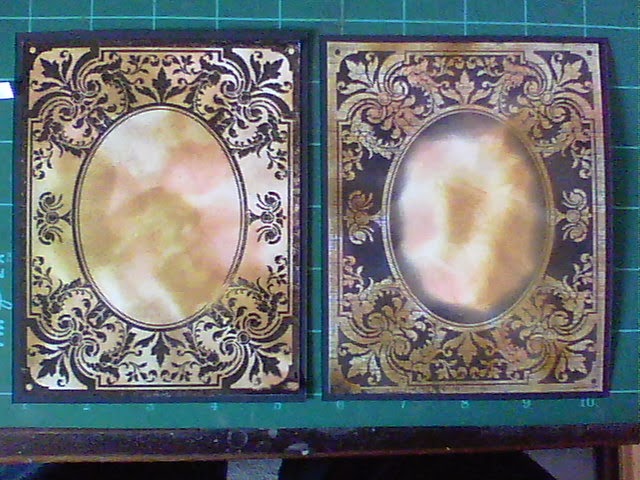
Above you can see the two samples I have done, if you look its as though I have produced a negative and positive from the same stamp. Here's how and what you will need.:

You Will Need,
Basic tool Kit
Background Stamp I used "Lavish Corners" by JustRite Stamps and available from Oyster Stamps
Distress inks any three colours, I used in the above samples:
Tea Dye, Frayed Burlap, Old Paper,
Detail Clear Embossing Powder.
Black Dye Based ink pad, i.e. Momento or Adirondack.
Heat Gun
Anti Static bag,
Versamark inkpad.
A5 Plain White Card.
Make up sponge.

Instructions.

Gather you things together and begin by randomly applying the ink to the card.


Random is good here you do not have to be to fussy. Make sure there are no white areas of the card showing.


What you are aiming for is the card saturated with ink. Now because of the nature of the distress inks you need to dry the card stock. So go ahead with your heat gun and dry the card.


Make sure the card is thoroughly dry before going on to the next step. If you prefer you can leave it to dry overnight and finish the technique in the morning.


Next step is to get ready your Versamark ink pad, clear embossing powder and anti static bag.
Go over the card with the anti static bag.
Mount your stamp on to a suitable Acrylic block.


Ink up your stamp with the Versamark ink pad. Pay particular attention to the sides and corners.


Pressed down firmly on to your card stock. Then care fully remove the stamp
Apply the Clear embossing powder over the card.


Here you can see the Stamped image with the embossing powder on. Yes it is white but goes clear when heated.. So go ahead and heat.


So now its heat set and ready for the next stage.
You will now need a make up sponge and you black dye based ink pad.


Begin by adding some black ink to the sponge and going over the image. Keep going until the whole image is "revealed".  What's happening is the clear embossing powder is resisting the black ink.


So here I have completely gone over with the black ink pad. With a clean bit of tissue go over the image and remove any excess ink. This pings it and brings it out more.


If you look closely at the corner I have used in my sample Linen card stock. This has automatically given me a more distressed look to the card. Of course if you desire you can use plain white card.


Trim the card down removing the excess card.


Matt and layer on to black card stock. Attach to card front and add any elements to finish your card.


Ok The one on the right is slightly different. What I have done here is instead of using the Clear embossing powder I used Black and then that is it, apart from trimming and matting and layering the card as before.

Enjoy.xx

Tuesday, 27 August 2013

Bauble card

Hello Peeps

This is a card I did with my stamping group on Saturday. It is a design by Dee Paramour and is taken from the Creative Expressions Project book vol.1.

The basic card blank that I used is a 8"x8" so please bear this in mind when you are trying for another size as what I have given here is for a 8x8 card.


ok so above you can se a picture of the finished project.

You will Need:

Basic Tool Kit
Stampers Anonymous Tim Holtz Collection Mini Holidays 4 stamp set .CMS 142
Versafine  Vintage Sepia
Distress ink Frayed Burlap
ink blending mat.
Spellbinders Die Heirloom Ornaments 2011 S4-334
Spellbinders Parisian Accents S5-034
A4 Embossing Folder I used Crafters Companion spot folder.
A4 sheet white card. x2
Glue pen
 
 
First thing is to cut all our pieces. I used the two largest baubles as arranged on a magnetic sheet and the border die.
Run through the machine and die cut the pieces.
once cut run through again to emboss using the appropriate boards for your machine.


The die cut pieces.
You will need to do 2 borders, and should be able to get from the same pieces of card.


The border is now place between the apertures that I have already cut, you also need to cut the large bauble as a solid piece so put that on your board as well , mine is below the one already cut.
Leave the machine out .


Take your second piece of A4 card and with the long edge running along the top of your cutter cut at 20.5cm. Keep the off cuts.


Turn the card 90 degrees clockwise so the edge in the previous step that was up against the 20.5cm mark is now along the top. Cut it at 13cm leave to one side
With the off cuts cut two pieces 20.5x3.7  use both of the bigger pieces if you fine it two hard but it is feasible to get the two pieces from the off cut in the step above.


You should now have three pieces of card:

1x 20.5cmx13cm
2x 20.5x3.7cm


With the larger piece pass through the die cutting machine using the embossing folder. Using the sandwich applicable to your machine.


Here is a picture of all the various elements to construct our card.


To start with take the two narrow pieces of card.
With the holly stamp and vintage sepia,  stamp along the top edge of one piece of card.


Keep stamping all the way along until you have a holly border.


On piece of card stamped
Repeat with the other piece of narrow card.


Take the solid bauble and stamp the angel from the stamp set roughly in the middle and at a angle . Use the photo as a guide.


All the elements that needed stamping has been done.


Here I have retrieved all my elements ready to apply the distress ink.


Place pieces on a ink blending mat.
Beginning with the two holly border pieces of card go around all the edges with the Frayed Burlap.
Apply ink to the ink blending tool and with circular motions start on the mat and bring the tool on to the card constantly using a circular motion. This should give a nice even blend to the ink on to the card.


Here I have done both pieces and as you can see the ink is nice and smooth. Nice and aged which is what we are aiming for here.
Be careful with the blending as you don't want to crease the card.


Next do the bauble shape with the hole.


 Ok so this piece is nice and distressed and I can now put it to one side as I do the others.


Repeat the same process with the solid bauble with the angel stamped on it.


 Here as you can see I have distressed the outside of the bauble and left the centre relatively white.


 Again repeat the same process with the distress ink with the embossed piece of card.


 So this has now been inked and again can be left to one side.


Finally repeat the process with the two borders. Be careful here as they are a little delicate. Try and highlight the embossing.


So here all my elements  for the card have all been coloured using the Frayed Burlap distress ink.
.


Taking the two border pieces apply Double Sided Stick Tape to all 4 sides


Open out your card blank and starting at the fold and at the top gradually lay down your first border making sure you have covered the white part of the card at the top edge. If you haven't don't worry just add a little ink to cover it up.
Also notice the holly border is nearer to the top of the card.


You will have a little bit hanging over the edge of the card trim with a craft knife or pair of scissors.


Repeat the with the other piece of card for the bottom and trim accordingly.

So both borders now in place.


Next add the larger piece of embossed card and as you can see from the photo its slightly over laps the borders this is fine which is why I done the photo like this so you can see. Stick in place as before.


As you can see we now have three pieces in place. all three pieces have been trimmed to the base card size


We now need to put on the borders.
Using a glue pen add glue all over the wrong side of the border..


Line the straight edge of the border with the top of the embossed card as in the photo


Repeat for the bottom border
Last thing is to add the bauble.


Add large 3Dfoam pads to the reverse of the bauble with the angel stamped on it.
Do not remove the tops from the pads.
Turn it back over on to its right side


Add small 3d foam pads to the "aperture" bauble as seen in the photo.
Attach to the angel bauble lining it up very carefully.
I married these two pieces first then attached to the card. this way if a messed it up I have only messed up the bauble bit and not the whole card.


Attach completed bauble to the centre of the card using the photo as a guide.


Attach a bow card completed.


Gallery

Below is further ideas and hopefully inspiration .